Reindeer Cake with a Twist Tutorial
How To Make a Reindeer Cake But With a Twist
Are you ready to make your own pink magical reindeer cake? This festive holiday cake is not your typical reindeer cake. It is the girl-fied version of Rudolph “the pink nose” reindeer cake. Originally, I was inspired by the reindeer cakes I found online but I didn’t have all the right ingredients at home so with a bit of imagination and modification this cake was created instead. And I’m pleasantly surprised with the outcome being that I’m an amateur baker and this is the first two layer cake that I ever made. Its not perfect but it’s more special that way. I decided to document the steps I took in building this cake below if you want to make your own reindeer cake. Plus, it also functions as a piggy cake without the antlers. Have fun and happy baking!
Things You’ll Need:
Eyes and Antlers:
- Semi Sweet Chocolate Morsals (Target)
- Parchment paper
- Reindeer Antler Template (I drew the template from Rosanna Pansino’s book “Baking All Year Round” or use reindeer antler templates on Google)
- Squeeze bottle (Daiso)
- Small spoon
- Pot and a bowl to create double boiler
Nose and Ears:
- Wilton Satin Ice fondant cake icing (Michael’s)
- Wilton Gel Icing Decorating set - only need the Pink gel food coloring (Target)
- Ear template (I drew the template from Rosanna Pansino’s book “Baking All Year Round” or use Unicorn ears templates on Google)
- Knife
- Parchment paper
- Cookie roller
Cake:
- 2 boxes of Betty Crocker Super Moist Yellow Cake Mix (Target)
- 6 Eggs total for the cake mix
- Vegetable Oil for the cake mix
- Water for the cake mix
- 8 inch spring form pan (I only had one but two would be better)
Cake Frosting:
- Powdered Sugar
- Unsalted Butter
- Vanilla Extract
- Heavy Cream
- Pink gel food coloring
- Piping Bags
- Spatula
- Coupler
- Wilton Tips # 18 And #67
- Hand mixer
Additional Tools to Build the Cake:
- Cake decorating turntable (I had a makeshift turntable by using a cutting board and a lazy Susan)
- Offset Spatula (I didn’t have this so relied heavily on the cake scrapper and a regular spatula)
- Cake scrapper
Instructions:
Steps in making the antlers, eyes, ears, and nose:
- First start by prepping the eyes and antlers- cut out parchment paper to cover your reindeer paper template. Set that aside as we will come back to that once we have the melted chocolate ready.
- Met the chocolate in a double boiler. Helpful blog on melting chocolate with double boiler: Wilton Melt Chocolate
- Then use small spoon to scoop melted chocolate into squeeze bottle.
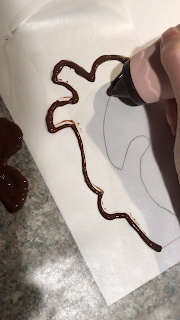
- Place parchment paper on top of reindeer paper template. Then trace the antlers outline with your squeeze bottle to release the melted chocolate over the lines. Fill in the entire antler outline with chocolate. Place parchment paper with the melted chocolate antler outline in the fridge for about ten minutes. Then take out the antler chocolate and add another layer of melted chocolate on top of it. Place back into the fridge for another ten minutes.
- When the antler chocolate has dried, use the same parchment paper to free form the drawing of the reindeer eyes with the squeeze bottle. You can draw two fat and wide U shapes or you can create multiple eye shapes to see which best fit your cake.
- Once eyes has been drawn with the melted chocolate, place the entire parchment paper with the antlers and eyes into the fridge. We will come back to that once the cake has been frosted.
- Next step is to create the nose and ears. Break out a chunk of the Wilton fondant. Use the cookie roller to flatten the fondant on top of another sheet of parchment paper.
- Use a knife to cut out the nose template shapes. These are the two larger white pieces.
- Then break out another chunk of fondant for the pink nose and ears. Add a drop of pink gel food coloring on the fondant and continue to mold and massage the fondant until the entire fondant turns pink. Helpful blog on coloring fondant: Wilton Color Fondant
- Tear off a pink chunk and roll into a ball for the nose.
- Then flatten the remaining pink chunks with the cookie cutter. Use the knife to cut out two ear pieces following the smaller nose template shapes.
- Place the larger white ear piece behind the smaller pink ear piece and pitch together. Repeat for second ear piece.
- Once the ears, nose, eyes, and antlers are set, it is time to move onto baking the cake.
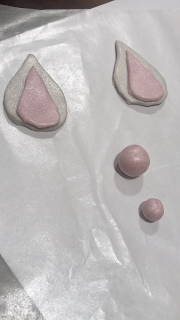 |
| Nose and Ears Step 7-12 |
Steps in creating the cake:
- First bake your cake by following the instructions on the Betty Crocker box mix.
- Once cake has been baked, leave it to cool for about 3 hours.
- When cake has been cooled, trim off the edges and level the tops of the cake so that the cakes are stackable. Helpful videos on cake trimming- Chelsweets Youtube
- Prepare buttercream frostings. American buttercream recipe 5 cups serving: Liv For Cake We will need at least two piping bags for the two different colored buttercream. Scoop a portion of the buttercream created without the gel coloring added into a piping bag. Make sure it is a good enough portion since this color will be used to pipe the spiral on the face of the reindeer, the spirals on top of the cake, and the edges around the entire base of the cake.
- With the remaining buttercream, add two drops of food coloring to make the pink buttercream frosting. Scoop into second piping bag. We will need a larger portion of pink buttercream as it is used to cover the entire cake.
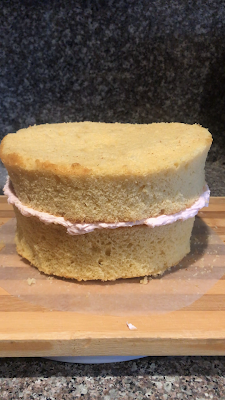
- Now time to assemble the cakes. Place first layer of cake on turntable and apply the pink buttercream frosting on top. Then place the second layer cake on frosting. Next, frost the entire side of the cake and top of the cake in the pink buttercream frosting to create a crumb coat. Once covered, place in fridge to chill for about two hours. Helpful video on frosting cakes- Chelsweets Youtube
- Remove chilled cake. Add a second and final layer of pink buttercream frosting all around the cake. This is the layer where you want to make smooth and clean.
- After cake has been frosting, pipe a mix of white and pink spirals with the Wilton tip #18 on top of the cake.
- Pipe a big white spiral on the front of the cake with the same Wilton tip #18.
- Cover the entire base around the cake with the Wilson tip #67
- Place the two eyes, the nose, the ears, and the antlers onto the cake. And TADA! You have created a magical pink reindeer cake!







Comments
Post a Comment